Beginning with ColdFusion 10 Adobe moved away from JRUN and released ColdFusion on Tomcat servlet container. As part of this change they also built their connection mechanism on top of the original ISAPI connector for IIS. This is the connector that BonCode replaces in many circumstances.
However, Adobe made modifications to both the Tomcat server code and the ISAPI connector code to accommodate their particular needs. Which brings up the question whether BonCode would work with the Adobe introduced changes.
The upside of this is things for CF developers on IIS continue to mostly work like they have in the previous iterations, with maybe the only exception being, that you can no longer use CFFLUSH with the out of the box setup. You actually have to disable connector buffering (this has other side effects that you maybe OK with maybe not). To do so go to {CF-Home}/config/wscoonfig/{connector-no}/isapi_redirect.properties. Change iis_buffer_enable to false and restart the IIS.
By now you also know that Adobe does not recommend you use the default Tomcat instance to host anything else besides ColdFusion. A good blog post: “What’s the deal with Tomcat in ColdFusion 10?” by Rupesh Kumar explains this in more detail.
On the other side, if you want to easily use one IIS to front-end multiple tomcat instances or applications, you really have to do something about the non-standard connector that ships with CF10-CF2018. Your IIS goes otherwise completely monkey-crazy if you try to work with the Adobe supplied one.
The good news is that that the BonCode connector has supported Adobe specific behavior in the transmission process since version 1.0.2 and CF10.
Install CF
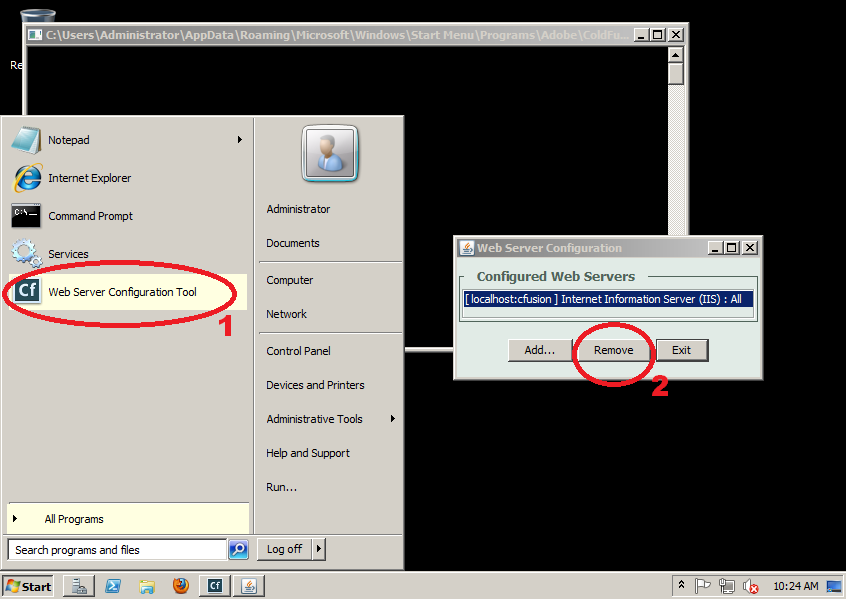
The first step is actually to install CF as usual. Once the server install of CF is complete, however, you will need to remove the existing connector via the webserver config tool like so:
Install BonCode Connector
Once the removal of the Adobe connector is done, you can download the BonCode connector from GitHub connector and start the standard install.
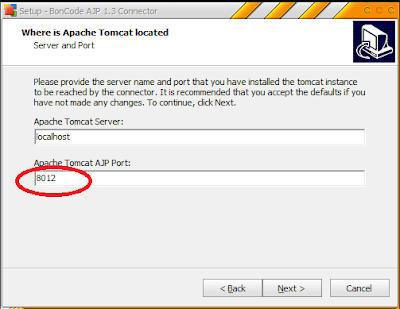
Accept all the defaults but once you get to the Tomcat information page, you will need to change the port based on your version of Adobe CF to:
ColdFusion 10: CF10 uses AJP port 8012.
ColdFusion 11: CF11 uses AJP port 8014
ColdFusion 2016: CF2016 uses AJP port 8016
ColdFusion 2018: CF2018 uses AJP port 8018
If your version is not mentioned, it probably uses a different port altogether. You can look at your worker.properties files to see which ports are used in the Adobe supplied connector and make the adjustments.
Below is an example of the change needed for CF10. Adjust as needed for your version:
Enable Adobe Mode:
Adobe uses a different communication pattern that is not compatible with regular AJP protocol. You will need to let the connector know about it. You do so after the install is completed by making a modification to the BonCodeAJP13.settings file. This is located normally in the BIN directory in your site document root or in the C:\Windows directory for global installs. Add the following directive:
<EnableAdobeMode>True</EnableAdobeMode>
You need to restart IIS after this change. That should be it for basic operations.
Securing The Connector
(thanks to John Dickinson for this passage)
Securing BonCode’s connection with ColdFusion:
Starting with ColdFusion 2018 Update 8 and ColdFusion 2016 Update 14, ColdFusion expects a secret phrase with each request for added security. ColdFusion requests return security errors until you tell BonCode about ColdFusion’s secret phrase.
Do this after the connector install is completed by modifying the BonCodeAJP13.settings file. This is located normally in the BIN directory in your site document root or in the C:\Windows directory for global installs.
First, find the secret phrase in ColdFusion’s Tomcat server.xml file located at the {cf.instance.home}\runtime\
secret="90A2DE1B-ABX8-5530-Add the following directive to the BonCodeAJP13.settings file, specifying the secret phrase you just copied, such as:
<RequestSecret>90A2DE1B-ABX8-You need to restart IIS after this change.
You may encounter an issue with slow response times after these changes. This is due to Tomcat resolution timeouts. Adding an address directive to your Tomcat server.xml AJP definition should solve this. Do not use localhost or 127.0.0.1.
address="::1"
Tweak the Connector
For advanced operations you will need to add wildcard support for certain paths that Adobe CF uses
If you want to take this a little further I would suggest a few tweaks:
a) If you want CFFLUSH support, check the appropriate option during the install of the connector on the options page.This is truly implemented as HTTP flush detection, rather than disabling of buffers and will not cause extra client or network overhead.
b) Special Server Paths: If you want to explore the full functionality of CF I would also recommend that you add the wildcard mappings to the appropriate sub-folders in your CF site. This is used for some of its flex and background features:
/CFFormGateway
/flex2gateway
/CFFileServlet
/cfform-internal
/flashservices/gateway
/flex-internal
/rest
/pms
/connector
The directions on how to add wilcard mappings are also in the manual that is included in the download package for the BonCode connector. You should also disable remote access to some to these using standard IIS access restrictions:
/pms
/connector
That is it for now. Please contact me via GitHub issues if there are changes that you wish to share.